[Inflearn] 스프링 입문 | 1 프로젝트 환경설정
1 프로젝트 생성
(1) Spring Initializr
- 스프링 부트 스타터 사이트에서 스프링 프로젝트 생성
- Gradle Project : 라이브러리를 불러와서 빌드해주는 툴
- Spring Boot 버전은 최신버전 중 정식 릴리즈 버전으로
- Spring Web, Thymeleaf(htmp 템플릿 엔진)
- 설정 완료 후 Generate > 압축 파일 다운로드

(2) Intellij
- 인텔리제이에서 앞서 만든 파일을 Open/Import

- build.gradle
plugins {
	id 'java'
	id 'org.springframework.boot' version '3.0.1'
	id 'io.spring.dependency-management' version '1.1.0'
}

group = 'jeong'
version = '0.0.1-SNAPSHOT'
sourceCompatibility = '17'

/* 라이브러리를 다운로드 받는 경로 mavenCentral */
repositories {
	mavenCentral()
}

/* Dependencies */
dependencies {
	implementation 'org.springframework.boot:spring-boot-starter-thymeleaf'
	implementation 'org.springframework.boot:spring-boot-starter-web'
	testImplementation 'org.springframework.boot:spring-boot-starter-test'
}

tasks.named('test') {
	useJUnitPlatform()
}
* build.gradle 오류 발생
- Spring Initializr, Spring Boot ver 2.7.7로 down grade

- Project Structure에서 SDK 및 JDK 버전 > JAVA 11

- JeongSpringApplication을 Run
> Tomcat을 사용하여 8080 포트가 열린 것 확인
> Localhost:8080으로 접속 시 오류페이지를 출력하여 확인


2 라이브러리 살펴보기
(1) 라이브러리
- External Livraries에서 Import하고 있는 라이브러리 전체를 확인할 수 있음
- 초기에 Import한 라이브러리 이외에 의존관계를 가진 라이브러리들이 자동으로 Import

- spring-boot-starter-web : tomcat, sebmvc
- spring-boot-starter-thymeleaf : html templete
- spring-boot-starter : spring-core / logback, jul-to-slf (logging)
- spring-boot-starter-test : junit(테스트 프레임워크)

3 View 환경설정
(1) Welcome Page 만들기
- index.html 생성 및 작성

<!DOCTYPE HTML>
<html>
<head>
 <title>Hello</title>
 <meta http-equiv="Content-Type" content="text/html; charset=UTF-8" />
</head>
<body>
Hello
<a href="/hello">hello</a>
</body>
</html>
- localhost:8080으로 hello페이지 확인 > 정적 페이지

- thymeleaf 템플릿 엔진으로 동적 페이지를 만들 수 있음
Thymeleaf
Integrations galore Eclipse, IntelliJ IDEA, Spring, Play, even the up-and-coming Model-View-Controller API for Java EE 8. Write Thymeleaf in your favourite tools, using your favourite web-development framework. Check out our Ecosystem to see more integrati
www.thymeleaf.org
- 파일구조
> controller : 웹 어플리케이션의 첫 번째 진입점
> hello.html : controller에 의해 치환될 파일

- 실행결과


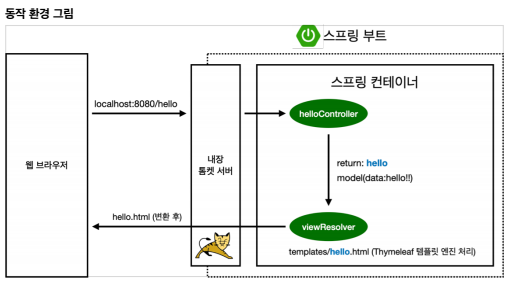
(2) 소스코드 및 실행구조
- jeongContraller.java
package jeong.jeongspring.controller;
import org.springframework.stereotype.Controller;
import org.springframework.ui.Model;
import org.springframework.web.bind.annotation.GetMapping;

@Controller
public class jeongController {
    @GetMapping("hello")
    /* 1. /hello로 들어오면 호출 될 메소드 */
    public String hello(Model model) {
        /* 2. model의 key값인 "hello!!"를 가지고
        model.addAttribute("data", "hello!!");
        /* 3. templates/hello를 찾아가서 랜더링 해라 */
        return "hello";
    }
}
- hello.html
<!DOCTYPE HTML>
<html xmlns:th="http://www.thymeleaf.org">
<head>
    <title>Hello</title>
    <meta http-equiv="Content-Type" content="text/html; charset=UTF-8" />
</head>
<body>
<p th:text="'안녕하세요. ' + ${data}" >안녕하세요. 손님</p>
</body>
</html>
4 빌드 및 실행하기
(1) 빌드
- cmd 상에서 프로젝트 디렉토리로 이동한 뒤 gradlew build 명령어로 빌드

(2) 실행


- 오류가날 때 전체 지우고 새로 빌드하는 방법
